How To Build A Rustic Stone Arch Bridge In 13 Days


For Hobbits To Ford Rivers Without Getting Wet

Completed Stone Arch Bridge After 3 years

Building a  Hobbit bridge in 13 days, How we did it.

We have a river running through our property separating the property in half. We have had a foot bridge accross the river but the need to provide for access of vehicles and tractors became a necessity.
The site is rustic and beautiful. Building a traditional bridge ie steel beams and concrete did not appeal to the local environment. The site was perfectly suited to a Hobbit arch bridge because of the rock foundations on each side of the river. Building a bridge of stone seemed to be the best fit for the surroundings. The sequence of pictures details the construction proceedure. The preparation prior to the 13 day construction period was procurring three steel beams 22 feet in length. They were purchased used for $700. The construction crew consisted of five Hobbit like persons working 10 hour days. Stones were locally available from the stream bed but would take a lot of work to move them to the site. Instead we procurred the needed stones from a local quarry. The majority of the costs were the purchase of the stones. Thirty two yards of ready mix concrete were used to create the structural arch and side walls. All concrete remains hidden behind face stones. The bridge was designed to carry heavy tractors. Within 5 days after the arch was placed a 17,000 pound backhoe traversed the bridge for the load test, successfully! The bridge construction process involved preplaced stones against falsework (forms) followed by shotcrete placement of concrete against the stone facing. When the falsework was removed all that is visible are the stones. No masonry stone setting skills required. The bridge has been in use for three years and is performing well. Check out this video for explanation of how arch works from an engineering standpoint. Click Here

How To Construct the Arch
Temporary False Work to Support the Arch Construction- Day 1 and 2
Prior to Installing three support beams which will span the river, concrete supports are constructed so each beam sits securely to the rocks below.
Day 3 -False Work Construction underway, 3 steel beams each 22 feet in length span the river, 4x6 timber creates a deck for building the arch
Arch Framing - Day 4
PVC plastic pipe is used to layout the curvature of the arch. 4x6 timber uprights and cross members frame out the arch structure

Arch decking -Day 4

2x6 boards are cut and nailed to the 4x6 framing forming the arch soffit.
Stone Facing Placed on Arch Soffit- Days 5-6
6-8" crushed rock is placed on the timber arch soffit. #4 Rebar 8" oc each way keeps rocks in place prior to shotcrete placement. The stones are placed one layer thick.
Shotcrete placement over stone facing-Day 7

A 12" thick layer of shotcrete concrete is placed over the facing stones. A total of 16 cubic yards of ready mix concrete which was pumped approximately 300 ft to the nozzle. Placement time was less than 2 hours. Note the vertical rebars at the edge of the arch. The bars will be used to construct the perimeter walls upstream and downstream of the bridge.

Note- All concrete had a black coloring added at the ready mix truck to match the grey stones. In other projects the joints between the stone are sealed with foam or sand to prevent concrete from flowing into visibility on the stone face. Because of the time frame to construct the bridge no sealant or sand was used. The colored shotcrete was very stiff and did not flow infront of the stones. The shotcrete is visible between the stone joints but blends into the stone and looks quite natural.

Vertical Wall construction- Day 9
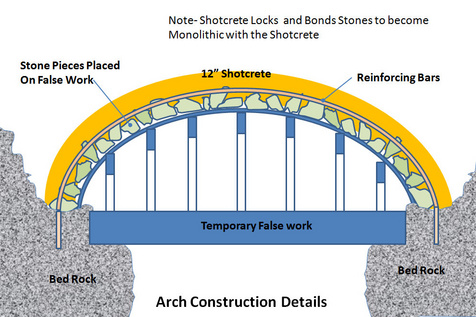
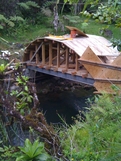
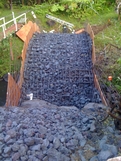
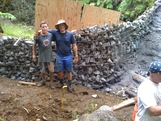
Stones are layed between the vertical rebars and plywood. Tie wire secures the plywood to the vertical rebars. The stone is only one layer thick. The plywood outer stone support is rather flimsy, not a whole lot is required of the plywood except to hold the stone in place. The next step of shooting concrete on the stone does not put a lot of stress on the plywood.
View of Arch interior with stone walls ready for shotcrete- Day 9

Completed shotcrete walls- Day 10

A 6" layer of shotcrete is placed on the vertical walls locking in the face stone. A total of 16 cy of concrete was placed on the walls.

Backfill of Arch interior space- Day 12

Stone and dirt is backfilled between walls and arch to form roadway bed. I would recommend that stone backfill be placed. When we placed dirt or mostly clay material in the backfill we found that the clay would deform and pump to the surface under heavy tractor loads causing ruts to form.

Close up of underside of arch after false work removal. The shotcrete concrete placed on the opposite side of the stone creates strong bond with the face stone. The stone becomes monolithic or composite with the concrete.

Load testing of new bridge- Day 13

Within 5 days of casting the arch concrete a 16,500 # backhoe crosses the bridge. Note the false work supports have been removed. Boy was I relieved!

Light weight jeep crossing bridge (4200#)
Links to other helpful sites

Another Construction Method Using Precast Concrete. Found on Youtube
Click on the picture to watch video

This is the only Stone Arch Bridge built faster  click this link